 This is Varathane tinted wood filler for filling nail holes and deep imperfections. It worked pretty good as you could either squeeze some on to the board or on your finger and work it in without a lot of mess. It sanded nicely and hid well under the stain and varnish.
 Here's the main post pieces after the nails have been filled but not yet sanded.
 The wood filler also worked nicely on the corners of the post where the gap was not perfect.
 Varathane wood conditioner is really intended for soft woods that may not take stain uniformly, but I wanted to see if it would moderate the way the red oak would take stain. I was hoping the grain would not absorb as much stain as oak normally does since I prefer a more subtle grain under the finish. I don't think the wood conditioner did much in hiding the grain.
I don't have a picture of the stain I used, but it was also a Varathane brand gel stain I had used on the doors in what they call an "Ipswich Pine" color.
 When it came to the finish coat, I knew I needed something good so the post wouldn't fall apart in the weather it's bound to see, so I called my buddy Evan. Evan has been working with wood for over 30 years and does lots of beautiful work for Roecker Cabinets for his day job. I felt a little queasy when Evan told me he doesn't think wood should ever be used for outdoor projects, although he has done a few for Roecker's. Not one to rub salt in the wounds of stupid people, Evan told me about the varnish they use when something has to be outside. The Sikkens varnish pictured above is intended for boats and has so much UV inhibitor in it that the liquid is opaque! Thank the Lord for the internet as all the boating stores in the world are as close as my computer, and less than a week later we were ready to make the post as watertight as a cabin cruiser.
 Meanwhile, there's plenty of work to do outside as the old post need to be replaced with a smaller substitute situated where we want the new post to sit. Actually we didn't have much choice on where the new post would sit since the main beams for the roof kinda dictated where the support should be. A couple of 2x4's nailed together and cut a fraction of an inch longer than the old post were adequate to take the weight of the roof off the steel post enough to slide it out. In the picture above I'm pushing the temporary post in with a sledge hammer.
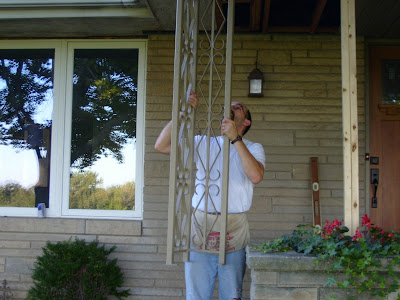 The old post slipped right out once the weight of the roof was removed...
 ... and it was unceremoniously retired.
 The new post is big enough to overhang a portion of the inside of the stone planter, so I thought it wise to add a small piece of stone in the corner so critters would have to crawl around the stone to get to the post. Securing the stone in the planter was a little concern until I realized there are many incredible adhesives in the world today, and some designed specifically for stone!
 A lot of adhesive and a little caulk later, I have a sealed corner under the location of the new post.
 Here's the 4x4 that actually does the heavy lifting of the roof now before it's adorned with the oak cover.
 As another sort of moisture/rot/critter barrier, I added a sheet of copper under the post cut slightly smaller than the oak post.
 In order to fasten the oak to the 4x4 post, I needed to add these "shims." You can see they are more than 3 inches thick on two sides, so I used lag screws to pull them up tight to the 4x4.
 Finally, here's the (almost) finished post doing its duty on the planter. You'll notice the soffit is finished around the post, and the only thing left is adding a bit of trim at the bottom and possibly at the top.
 Everything always looks better from a distance, so here's a shot from the driveway. It feels good to have the project at this point, and Karen is glad to have the soffit finished, but until all the trim is done, it's just one more unfinished project... Lest that sound too defeatist, we are glad to have most of the outdoor work finished before winter.
Looks great!
ReplyDelete