Showing posts with label transportation. Show all posts

Saturday, June 8, 2013

Traffic jam

Our road doesn't get a huge amount of traffic, and a disproportionate percentage is agricultural equipment, but today we experienced an annual phenomenon that raises the tractor percentage even higher.  Several times this morning, groups of tractors like this rumbled by together.  You see, the Tremont Turkey Festival is taking place this weekend and the antique tractor pull event occurred today just two miles north of our house.  Evidently quite a few contestants from the south find it convenient to simply drive their tractor to the competition, which makes for little parades like this all morning.

Maybe it's because these convoys don't happen every week, or maybe it's because you don't see this in the big cities; whatever the reason, I like it.

Saturday, June 2, 2012

More than you wanted to know about a bicycle crash

Since it's still pretty fresh in my memory, allow me to tell you a bit about the results of my carelessness on my bicycle.  I was enjoying a delightful bit of exercise last Monday evening, riding pleasant roads with enough elevation change to be interesting and yet not overwhelming.  A little over half way through my ride, I started down the hill near the west end of Tullamore Road, and looked forward to the rest it would provide for at least the next half mile until the effect of its slope would disappear.

Although I knew there was a fairly sharp corner about halfway down the hill, I neglected to brake until much too late.  By the time I reached the beginning of the turn it was apparent that I would not be able to brake hard enough to stay on the road.  My odometer indicated I reached 36 mph, which was probably just before I began braking.  My path took me to the far side of the right turn where I rode along the guard rail on the left side of the road for a short distance before I was catapulted.  The view of the guard rail below is similar to the last view I had before I closed my eyes.

When I stopped moving and opened my eyes, I was about forty feet further down the road, about fifteen feet down a grassy slope on the other side of the guard rail.  I couldn't see my bike, my helmet was falling off my head, and my back felt stiff just below my shoulder blades.  I climbed up the grassy slope to the road and sat on the guard rail while I tried to stretch my back and push the broken pieces of my helmet together so it would fit on my head.  Since my bike wasn't on the road, I concluded it must be near where I landed in the ditch, so I climbed back down the slope and found it about ten feet further downslope from where I landed.  After I carried it back up to the road, I was surprised to find everything intact on the bike (except the chain which had simply jumped off the chainring) and no damage evident anywhere.  Equally amazing to me was my observation that my only apparent missing skin was on a few fingers of my right hand.  My legs and arms had no cuts or abrasions at all!  After thanking God for preserving my transportation home, I climbed aboard and started down the rest of the hill toward home.

After riding about a half mile, something unfamiliar about my vision made me realize I had lost my glasses in the fall.  As long as there was a small chance I might find them, I had to go back and look.  I knew the probability that I would find the glasses was very low, so I entreated the Lord to bless my efforts and bring me to them.  I searched about half of the area where I had come to rest for about five minutes before the glasses were visible to me again.  God was thanked again.  Now that I had all my possessions, I climbed back on the bike and started the ride home again.

I didn't know the source of the stiffness in my back while I was riding, but it was apparent that I could not comfortably expand my rib cage as far as normal, so my breathing was not as deep as I desired.  X-rays taken by my chiropractor the next day allowed him to diagnose a compression fracture of my T9 vertebra, which is identified by the yellow arrow in the image above.  You can see that vertebra is not as square as the others around it, and is tapered toward the front.  Fortunately, the damage to the bone is concentrated toward the front of my body and not toward the back, and I have no symptoms indicating any damage to my spinal cord.  Several sources indicate spinal cord damage at this location can lead to paralysis below the waist.  Again, I'm grateful for God's mercy in limiting my injury.

It wasn't until I looked in a mirror when I got home that I realized my head was bruised and scraped in this colorful manner.  This picture was taken less than two days after impact, so the color is more severe in some places while less severe in others, but I think you get the idea.  My left shoulder showed similar bruising, and my left ear was pretty beat up, so it was apparent I probably first made impact with earth on those parts of my body.

Since my leg and bicycle showed no indication of contact with the guard rail, I believe the front wheel of my bicycle was probably stopped by some object on the ground while my momentum carried my body over the guard rail in a half flip, ultimately landing on my head.  Since my shoes were clipped to my pedals, I think my flying body must have pulled the bicycle over the guard rail behind me, and as I hit the ground and rolled, the bike must have detached from my shoes and flown over my body down the slope of the ditch.  I don't think my left foot released from the bike pedal easily, as my shoe and its cleat are both damaged in a manner that would suggest a lot of force was required to separate them.  I wish I could have witnessed all the gyrations my body and bike went through, as I think it would have been very interesting to watch.  Again, I'm grateful that God mercifully spared me contact with the guard rail, as I believe my injuries would have been more severe had I hit it.

This view of the inside of my helmet shows the cracks in the front (right side of the image) that resulted when the full weight of my hurtling body forced the helmet into the earth.  I had no dirt or grass stains on the front of my body after the fall, but once I removed my jersey at home, I could see it was covered with dirt and grass stain skid marks on the back.  That evidence suggests I may have quickly rolled on to my back and/or slid down the slope of the ditch primarily on my back.  Given the type of damage to my vertebra, I believe it happened when I first made impact with my head.

Four days after the crash, I returned to the scene to look for more evidence of what happened.  The video below documents a good bit of what I found.


Looking over the scene made me even more aware of God's mercy through this incident as there are plenty of objects I could have contacted that would have caused much more damage than what I suffered.  My chiropractor informs me that my vertebra will require 8 to 12 weeks to heal completely, which should be enough time to remind myself that carelessness sometimes has painful consequences.

Sunday, April 8, 2012

How to replace an LED reading light in a 2008 Chrysler Town & Country

We make good use of the reading lights mounted in the ceiling of our minivan, so it was a real disappointment when one of those lights suddenly went so dim as to be of little use.  Our local dealer offered to fix the problem for $143.50, which I thought was a bit on the expensive side, so I turned to the internet for help.  I didn't find a lot there, other than one other minivan owner that had a couple photos of the light assembly.  In order to fill that void in the internet, here's my documentation for the benefit of all that attempt this repair after me.

This is the light on the passenger side that is much more dim than normal.  If it's not obvious from the photo, you'll just have to trust me.

By contrast, here's the fully functioning light on the driver's side.

To get to the lights you'll need to pry on a corner of the console enough to get your fingers between the console and the roof liner so you can pull it downward.  Be careful you don't damage the liner trying to get your prying instrument in place.

There are no threaded fasteners holding the console to the roof, so just pull on each corner until you pull the plastic tabs on the console housing out of the clips that will probably still be captive in the slots on the ceiling.

This is what the console looks like detached from the ceiling.  Note the tabs in the four corners, and the two light assemblies on the right side.  Before the problem light was removed, I switched the wires from the passenger light with the wires for the driver light so that I could determine whether the problem was in the light or the wiring harness that feeds the lights.  Since the passenger light was dim when plugged into the other side of the harness, and the driver light was bright after being switched, I could conclude that the problem was in the light assembly itself.

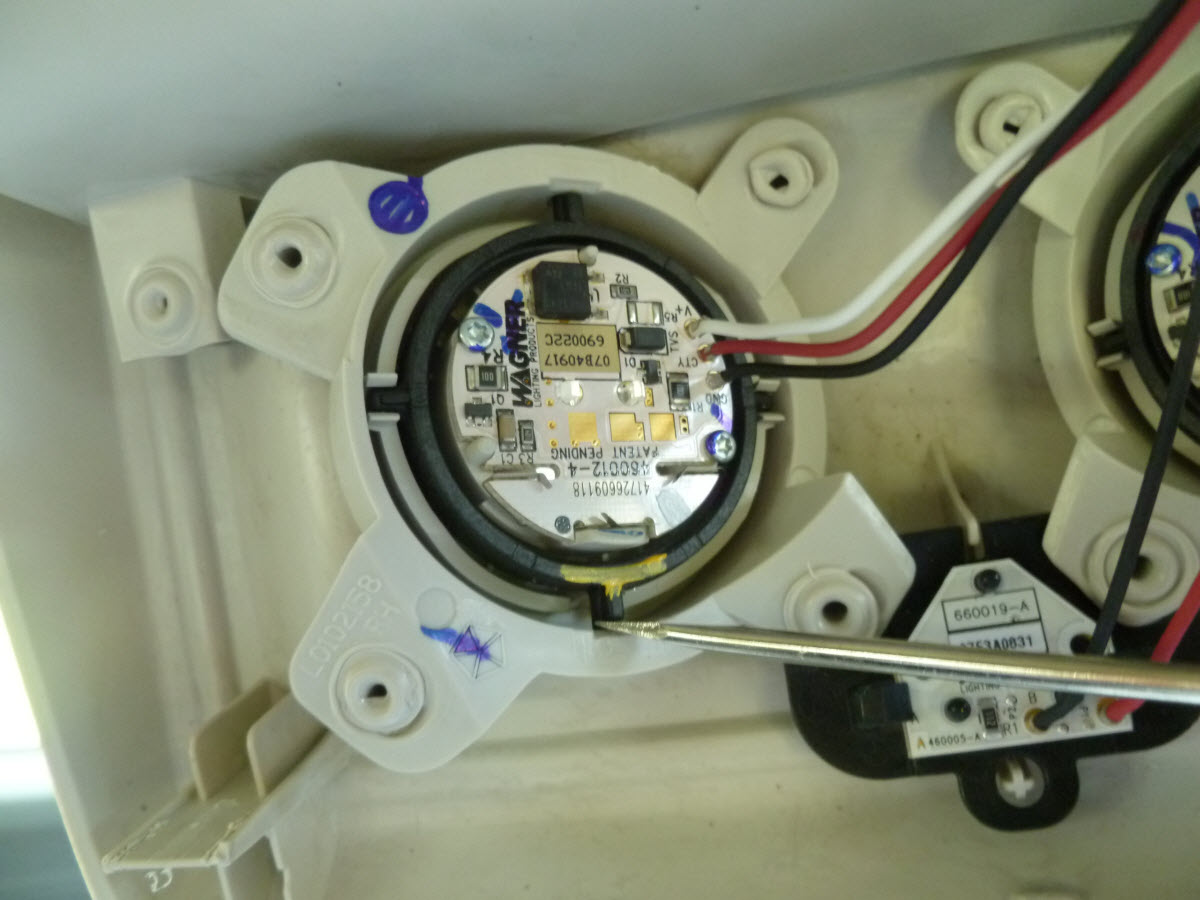
The light is held in the housing by two plastic posts, upon which it pivots in normal operation.  In the photo, I'm using a small screwdriver to pry one of the posts enough to get it to pop out of the housing.  There's enough springiness in the black ring to accomplish this without a lot of force.

The light assembly can then be removed as the other post will easily slide out of its hole.

The clip attaching the light to the wiring harness can be easily disengaged by pressing the small tab with your finger.

This is the light assembly as you'll be able to purchase it from your Chrysler/Dodge dealer.  I doubt that you'll find this one at the aftermarket auto parts stores, although if someone does find it at a non-dealer site, I'd love to know about it!  I removed the two screws holding the printed circuit board to the pivot ring to see if I could purchase parts at that level, but the dealer only sold them as you see in the photo.  In fact, our dealer will only sell these lights in pairs, so I bought two lights for $103, tax included.

Assembling the new light involves placing one post in a hole and simply pushing the entire assembly as shown until the second post pops into its hole.  Barely visible in the photo is a slight ramp outboard of the hole so the post will slide more easily.

Before the console can be attached to the ceiling again, I found it worked best to remove the metal spring clips from the ceiling with your fingers or a pair of pliers.  I found it was actually easier to grab with my fingers, although the clip does have some sharp edges.

The clips can then be pressed on to the plastic tabs on the console housing.

The console is now ready to be mounted to the ceiling again after all four clips are mounted on the four tabs.

Pounding firmly with your fist on each corner of the console will seat the clips in their slots.

The finished product is a properly bright light.  I don't know much about why an LED light goes dim, but unless one can replace the proper components on the circuit board, perhaps there aren't any cheaper options for this repair.  As I mentioned earlier, I purchased two of these lights and have only used one so far.  I'd be happy to sell the second one to any of my friends for $51.50 should you ever find yourself in a light-less predicament.

Monday, February 21, 2011

February cycling -- Illinois style

My friend Tim in Pennsylvania posted a video on Facebook of a motorcycle ride he took last Friday in gorgeously uncharacteristic weather there. That prompted me to get out on the bike yesterday to enjoy the mild (55 F) weather here in Illinois. Although it was not as sunny and pleasant here as it was in PA two days earlier, it was still satisfying to enjoy the mild weather, and record the ride on video for Tim's, and your, benefit.


This was my first attempt at recording video while riding (I didn't have the luxury of having someone else do the filming), so I was disappointed that the wind noise makes it hard to hear what I'm saying. I'll leave it to our carefully observant readers to determine the full message I've left for Tim in the video. Give me your best guesses in the comments section.

Thanks for visiting!

Saturday, August 14, 2010

Virginia in August, Day 1

Virginia in August? When the forecast calls for a high temperature of 104 degrees? Do they have air conditioning there?

Even though we try to avoid vacationing in summer due to the crowds and hot weather, we were compelled to travel now in order that Lily might attend a historical sewing class offered in Williamsburg. So while Lily endures a classroom for three days, the rest of us get to run around enjoying our tourist status.

Since we don't have a ferry near our home, we made the trip across the James River on the Jamestown-Scotland Ferry just for the experience. The ferry fleet is made up of four boats, and we happened to be placed on the Pocahontas on each of our trips, and as you can see, we had plenty of room while enroute.

Since we're not ashamed of our tourist status, we were quick to hop out of the car and wander the boat snapping photos. The natives were content to sit in their vehicles sleeping or reading the newspaper, but we thought that sounded pretty boring and stuffy. The fresh air over the river was more our style. It's pretty windy out in the middle of the James River, enough so that one needs to have their hat well pinned.

This is another boat in the fleet, the Williamsburg. The voyage takes about 15 minutes and we found ourselves usually approaching the dock just as the previous boat was leaving.

Once in Scotland, we didn't really have another destination, so we consulted Garmin's list of attractions in our GPS. Less than 20 minutes from the dock at Scotland is Bacon's Castle which sounded good to us even though we'd never heard of it before. The section of house on the left was built by Arthur Allen in 1665 and is one of the few examples of Jacobean architecture in America. With four floors (including basement), brick construction throughout, and over 5,000 square feet of living space, it was one of the grandest homes in the colony at the time. In fact, most homes in Virginia in the 17th century would have fit inside the master bed chamber of this home.

The Greek Revival addition on the right was added in the 19th century, and is joined to the original house by a hyphen that served as the new formal entry for the home. Close examination of the central tower on the older section reveals it once served as the entry which was converted to a window at the time of the addition.

The triple chimneys and curvilinear gables are likely the most distinctive features of the building, and are impressive in any period let alone less than sixty years after the colony of Virginia was established.

The home was named by neighbors after Nathaniel Bacon's men captured it in 1676 intending to use it as a fortress during Bacon's Rebellion. Fortunately it never came under fire, and there is no indication that Nathaniel Bacon ever set foot on the property. Although the Allen family were not supporters of Bacon, they and all subsequent owners have endured the popular name of the estate.

Even though it only dates to the mid 19th century, I think the entry in the hyphen was still nicely executed. Some of the rooms are restored to the style they probably would have known in the 1600s, while others are decorated to reflect their 18th century state. The tour takes you into almost all the areas of the older house, and reveals many of the structural features you don't normally get to see. The only negative is that photos are not allowed inside the building.

On the way back across the James River, I had to take this photo to show that the Garmin continues to faithfully show your location, even when you're in the middle of a river.

The view from the observation deck of the Pocahontas on our way back to Jamestown.

Here's a view of the Susan Constant, Discovery, and Godspeed that we'd not seen before. The ships are excellent recreations of the three ships that made the original voyage to Jamestown, and can be viewed up close and personal by purchasing a ticket at Jamestown Settlement (which we had done on a previous trip, but skipped this time).

Finally, evidence of Lily's work today. This is the front of the bodice of the Polonaise gown she's working on in her class. Lots of draping and pinning and cutting in class, and then hand sewing in the evenings for homework. I think she enjoys it.

Wednesday, May 26, 2010

Freeport McMoRan Morenci Copper Mine

Even though we're back home now, I still have more vacation photos to share. This post documents a special treat I enjoyed during our stay with the Pickle family: Steve showed me around his workplace. This is not just any workplace -- Steve works at one of the largest open pit mines in the world, that not only has a lot of neat machines on site, but a lot of those are Caterpillar machines.

Here are three of the many Cat 793D trucks that haul rock at this mine. You'll see in a later photo that the bumper on the front of these trucks is about 6 feet off the ground, just to put things in perspective. You'll notice the trucks are driving on the left side of the road (like they do in England) even though the drivers sit on the left side of the vehicle. Even though there are huge berms along the sides of every road in the mine, placing the driver next to the edge of the road allows them to avoid unexpected trips over cliffs. These trucks can easily roll over the top of a pickup, so the mine is very careful to control traffic around these vehicles.

The trucks are filled by shovels that clean up material left when the side of the cliff is blown away by explosives, and the trucks carry the rock to sites like this: a large basin where the rock is loaded on conveyors to move to the next processing area. Mining copper isn't like mining coal or diamonds, those materials are distinct from the rock around them and easily separated. Rock that contains copper must be crushed, drawn into solution with acid, and then plated back out of solution with electrolysis. The copper is then removed in sheets and shipped in bulk.

The sloping conveyor in the background has transported the pile of rock you see beneath it, which will be transferred to the cylinders closest to the camera. I believe those pulverize the rock so the copper can more easily be drawn into solution in a later step. The light colored plain beyond the conveyor is the rejected material left after the copper has been removed, aka tailings. It has been spread at that location for decades, and has literally filled a valley.

Steve's department maintains the infrastructure of the mine, supporting the production equipment in numerous ways. One of those ways is offering crane support when the conveyors need to be moved. In this picture, two men on the blue manlift remove caked-on dirt from the conveyor supporting structure so the crane doesn't have to lift more than necessary. The yellow crane on the left is simply managing the support legs, one of which is laying on the slope behind it. The conveyor itself was lifted by a 300 ton crane that is out of the picture behind me.

I've enjoyed trips on trains in the past, but never as a passenger in the locomotive. That experience has now been realized thanks to Steve and his crew. Steve's department also manages the trains that haul cars between the mine and a small railyard in Clifton nearby. In this picture we were taking four locomotives down the 4.5° slope to town where several cars were waiting for us.

Here's a view of the loaded train making its way back up the mountain pulling six tankers full of sulfuric acid and one empty gondola. Lots of curves on the route, and plenty of crossings so the engineers can blow the horn!

Here we are safely back in the yard at the mine where Vince and Jose have safely completed another journey. Most of their trips are uneventful in a good way, although they did share a story with us about a runaway train and derailment one of them experienced early in his career. Not joking, they told me to be prepared to jump out of the train should they instruct me to. I was very attentive the entire trip.

Looming over the massive structures in the foreground is the largest crane in the mine, capable of lifting 500 tons! When we visited this work site the crane was loading the pieces of a large shovel onto trucks so the shovel could be reassembled at another mine. When we left town a couple days later, we saw one of those trucks on the highway with his escort vehicles. The shovel bucket on the right is large enough to drive a pickup inside it, and is probably about the size of my first apartment.

A trip to a mine would be incomplete without a visit to the maintenance/repair building. Several of the 793D trucks were in various states of disassembly in the building, and along with the track-type tractors, made me feel right at home.

Here are the sheets of the finished product. Each bundle weighs about 6,400 pounds, so this image contains about $2,000,000 of copper sitting here waiting for shipment.

The wives and kids joined us for lunch at a nearby park, so here's a shot of the youngsters with the mine behind them.

This is the view over their shoulders. I've stitched together several images to make this one, so it's not perfect, but it does give you some sense of the size of at least one part of the mine. Click on the image to see the larger version of this image. Thanks for visiting!

Saturday, May 8, 2010

The Pioneer Museum in Flagstaff

The Pioneer Museum is part of the Arizona Historical Society, so we were hoping it would give us a sense of the history of Northern Arizona, and Flagstaff in particular. The history recorded here is quaint and frequently presented in first-hand accounts, which we find preferrable to revisionism based on the latest theories. Most of the exhibits are specific to a topic and time period, so we didn't find a general, chronological history of the area, but we did find several interesting vignettes.

The museum is housed in the former Coconino County Hospital for the Indigent, on the grounds of the former "poor farm." Several exhibits recall details and names from the hospital years (1908 to 1938), including a reconstructed surgery and an iron lung.

One of the larger exhibits contained sketches, photos, and first-hand accounts of the volunteers from Arizona that fought with Teddy Roosevelt in the Spanish-American War in Cuba. The Arizona contingent brought a mascot with them: a mountain lion cub named Josephine. Josephine grew to adulthood, and provided many exciting moments for the soldiers, especially when her natural instincts drove her behavior around the dog and eagle that were mascots from other states. That's Josephine's head in the picture above. Her cause of death is undocumented, but her hide was used as a rug for several years until it wore out, and all that was salvaged is what you see above.

Although labeled "Rough Riders," the soldiers displayed amazing horse handling skills and felt the title denigrated those skills. Ironically, very few horses were transported to Cuba with the soldiers, so most of them fought on foot as infantry. The display case shown above contained a campaign hat, a sword, and a rifle, among other things. I don't recall the description of the rifle, so I'll challenge any reader familiar with guns to use what information they can glean from the photo to enlighten the rest of us.

Although originally a homesteading cabin for one of Flagstaff's earliest white settlers, this building was moved to the museum site so folks like us could snoop around in an original structure from about 100 years ago. Ironically, this is one of the most modern dwellings we've visited here in Arizona.

Also on site is this train that had served as a logging train quite a few years ago. Unfortunately, I think I've lost the printed information describing this train, so again I'll challenge a train expert in our readership to help me out on this one. Thanks in advance for your assistance, and thanks for visiting!

Thursday, February 4, 2010

Family history as told by the odometer

If you're like me, when you pass a milestone, you reflect on the experiences that brought you to that place. What would be more natural when your car passes the 200,000 mile mark than to look back at your mileage log and remember the events that logged those miles?

1997 wasn't a full year since we bought the car in April. The Taurus replaced a 1984 Honda and became "Karen's car" since it was obviously the most reliable of the two cars we owned at the time.

1998 through 2002 represent the quiet years of use by a mom with two young children. Homeschooling started in 2001 so that may have contributed to the slight dip that year.

The change in trend starting in 2003 can be traced to at least two effects. In late 2002 we bought a timeshare and started feeling our way back into traveling more on vacation. Mid year 2003 we donated our second car to charity, and became a one-car family for the first time since 1995.

2004 included our first trip to Williamsburg, VA in the spring, and a 5,000 mile trip through the west in September.

By April 2007 we were a two-car family again, although the Taurus didn't really become the secondary car until early 2008 -- almost eleven years as our primary transportation. Mileage for 2009 increased slightly because I was driving further to work most of the year.

That brings us to where we are today. Unfortunately, we probably won't be able to follow our family's behavior with the Taurus mileage anymore, but it may be possible in the future using the minivan log. Stay tuned: more exciting charts in the future!

Wednesday, February 3, 2010

200,000

In April of 1997 we bought a brand new Ford Taurus that we hoped would serve us for many years. As of yesterday, it's traveled 200,000 miles and continues to serve us well. This is the first vehicle we've driven this far, and I'm grateful for each additional day of service we can squeeze out of it.

I'll spare you the details of the Toyotas, Hondas, and Mazdas that died before they reached this milestone, I'm just happy to finally drive a car this far. If someday it hits 300,000 miles, you'll read about it here first!