Over the past year we've tested our home for radon both with a one-week test, and a 3-month test. Both tested over the EPA's recommended level, with the highest test measuring 16.1 pCi/L. Knowing we had relatively high levels of radon in the house, we set about the research of figuring out what to do about it.
 If you've read a few posts on this blog, you probably realize that I'm a DIYer. I could hire someone to mitigate our radon, but most of the aspects of the job don't look that difficult, and I'm sure my perfectionist tendencies would find fault with some part of anyone else's work. So after a good bit of surfing the internet and gathering information, I began buying the necessary components and dove right in. Pictured above is the heart of our system: the fan (Fantech HP190). We chose an active sub-slab depressurization system given the success of that type of system in other homes in our area, and my expectation that our ranch style house might be well suited to that method.
The ASTM E2121-09 Standard was very helpful in identifying system options, and helping me recognize where cutting corners might render my system ineffective. I recommend that document as essential reading for anyone installing their own system.
 One of my mistakes was trying to locate the hole in the basement slab too close to the basement wall. As you can see, the footing for the wall extends about 4.5" from the wall, so I had to enlarge the hole for the pipe so it was completely over the gravel under the slab, and not on top of the footing. I used a 1/4" bit in my hammer drill along with a chisel and hammer to get through the floor, although I'm sure renting a larger drill with a larger bit would have made the job go much faster.
 The rubble in this photo is mostly the broken concrete block pieces I found beneath the floor and on top of the gravel. I doubt that there is a lot of this rubble under the floor, but it stretched beyond where I could reach through my hole in the floor. The negative thing about these pieces of block is that they are a bit difficult to break up and remove unless they are immediately below the hole. The positive thing is that they are fairly loosely packed under the floor, so I think the sub-slab gas should travel freely around any pieces still under the floor. I did not test the media under the slab for air movement, which is one advantage a good contractor may have offered.
 A 4.5" hole saw proved to be the perfect tool for cutting through the floor in the closet we chose as a chase for the PVC pipe that will transport the gas from beneath the basement to above the roof. It was painful to cut a hole in the oak floor, but I think the radon system will be a permanent addition to the house, so it's unlikely anyone will ever have to fill this hole in.
 The plaster ceiling in the closet received a similar sized hole, although I found a small chisel and hammer are all that's necessary for this opening into the attic.
 Rather than move my shelves to the other side of the room, I put a couple of 45 degree elbows in the pipe to align the hole in the slab to the joist space above. In this photo, the floor has been patched with concrete mix, and after that dried I filled adjacent cracks with caulk. I used 4" PVC to keep the pressure losses to a minimum since I used about 40 feet of pipe and several elbows.
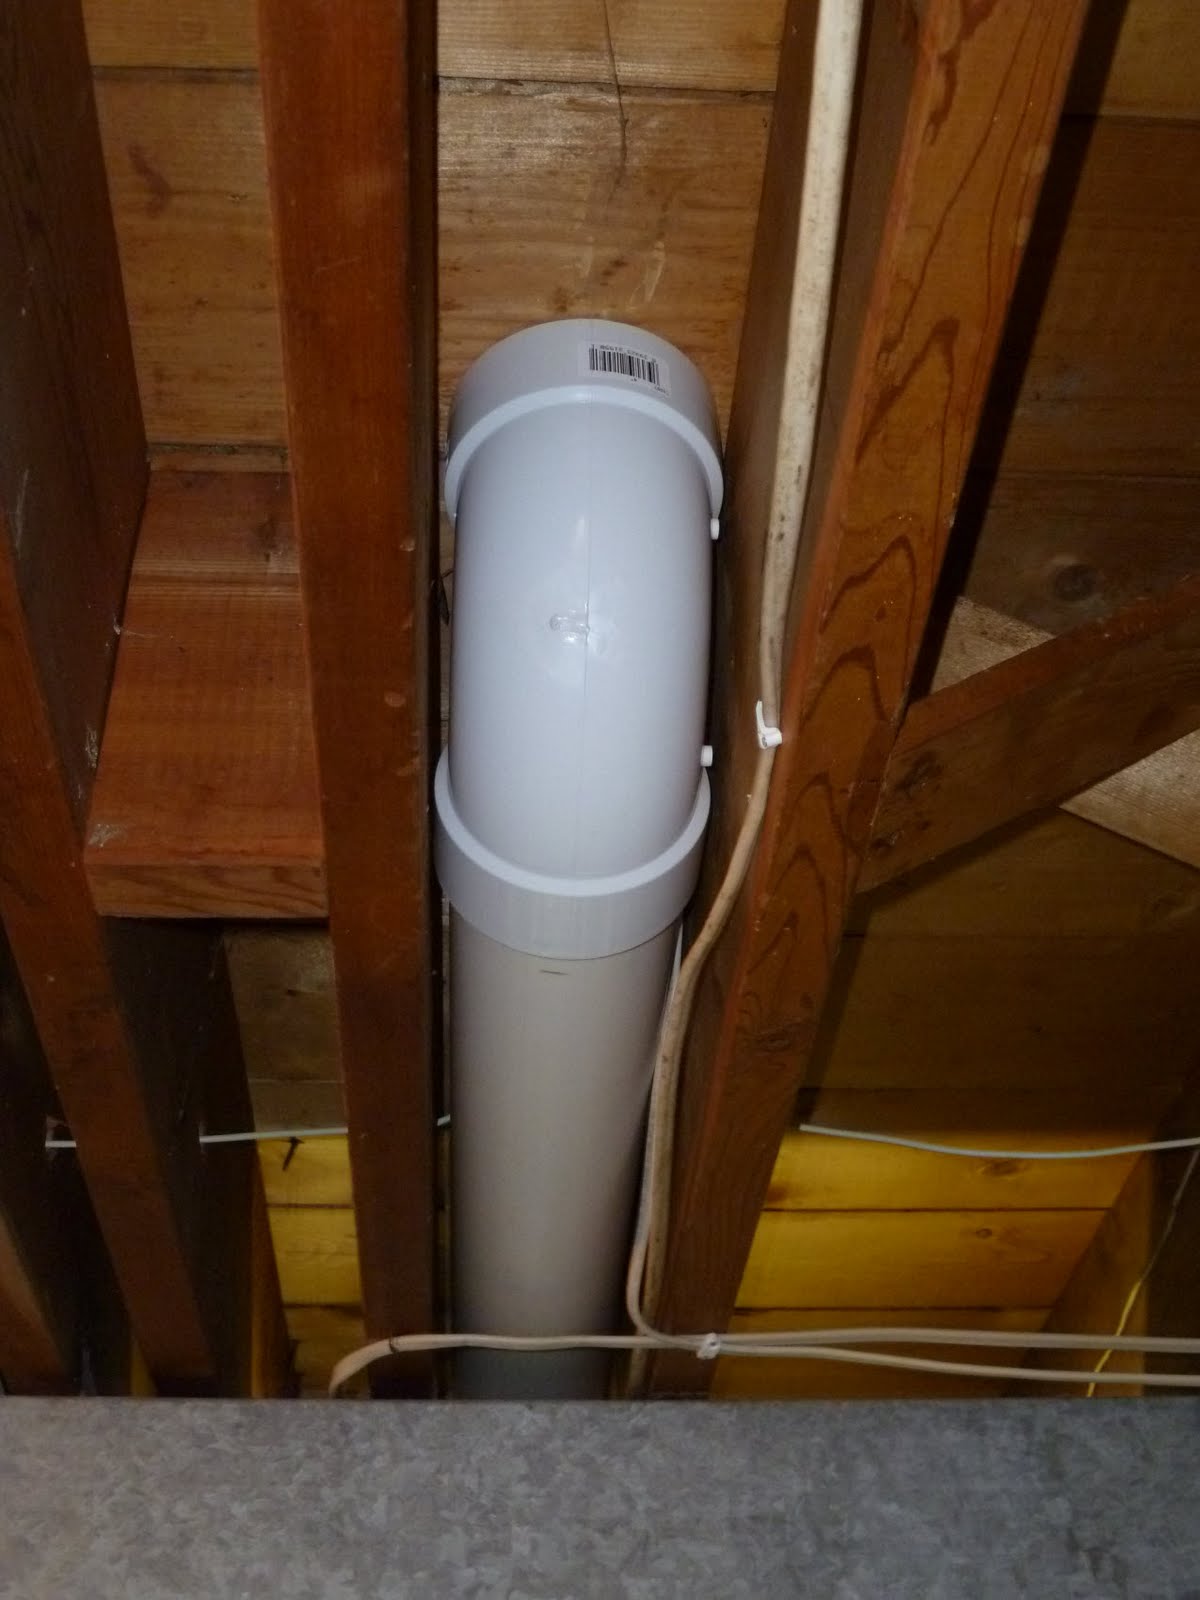 This is the joist space I chose in the basement -- just big enough to comfortably fit the pipe fittings, and suitably located under the first floor closet. Because the basement is not very deep, I was not able to run a section of pipe from this elbow in the basement all the way to the fan in the attic without a joint in the closet. I suppose I could have enlarged one of the holes in the closet to allow more room to manuever a longer piece of pipe into place, but I didn't think that was worth a larger patching job later.
 The fan is mounted in the attic just above the first floor ceiling with flexible rubber couplings on both the inlet and outlet. I ran a new wire to the attic from the breaker box so the fan can have a dedicated circuit. A switch in the attic might be handy should the fan need service, but I didn't bother to install that now. The smaller black tube connecting the inlet and outlet pipes is part of the condensation bypass system I installed to reduce the amount of water flowing back through the fan. Small plastic elbows on either end of the tube allow the condensation to flow from the uphill outlet side of the exhaust pipe to the downhill inlet side. The Fantech literature recommended a condensate drain like this in installations where condensation was likely, so I complied to avoid the risk of a voided warranty.
 Here's a closer view of the internal features of the condensate dam. Pretty clever looking -- I hope it works! In case you're wondering, the primary reason for putting the fan in an inconvenient place like the attic is to insure that the pipe in the living spaces of the house is at lower pressure than the air outside the pipe. If any of the pipe joints on the inlet side of the fan would leak, air from the house would be pulled into the pipe instead of the radon-rich air being blown out of the pipe and into the house. The attic is well ventilated, so hopefully any radon leaks up there would be exhausted from the attic in short order.
 The run across the attic is over ten feet horizontally, has plenty of slope, and doesn't have a lot of obstacles to avoid. I ran that far to avoid exhausting the radon-rich air close to other openings in the roof per ASTM E2121-09. In my case that meant avoiding the chimney and roof vents.
 The top side of the roof has a simple flashing and protective cap for the pipe. I figured the cap will keep some of the rain and critters out, although the mesh does represent a surface on which frost or ice could form and block air flow. I'll keep an eye on that when the outside air temperature is low.
 I ran 14 gauge wire back to the main house panel, and installed a 15 amp circuit breaker dedicated to the fan.
 Finally, here's the manometer mounted to the pipe in the basement that allows one to quickly ascertain that there is indeed less pressure in the pipe that outside it, which means the fan is running. I've noticed a slight variation in the liquid levels on this gauge from one day to the next, but I'm not sure if that represents pressure differences beneath the slab, or atmospheric pressure changes, or both.
We have not yet tested our radon levels now that the system is operational, but we should have that data soon, and we'll share it here. I'll also summarize the cost of the system in a future post, so we can all determine how much my time is worth. In the meantime, feel free to ask any questions since I'm sure I left many details unmentioned.
Thanks for visiting!
Related posts:
Radon Mitigation System Cost Breakdown
Radon Mitigation System Testing
Related posts:
Radon Mitigation System Cost Breakdown
Radon Mitigation System Testing
As soon as I looked at the title of your post, I immediately wrote it off as being "very dull indeed." However, upon further investigation of the post, I found it to be purty interesting! It has to be pretty fascinating to retain my attention for a full 17 paragraphs :) Wow, 16.1 pCi/L! I believe our home level is around 3 pCi/L. I think it's neat how you installed it yourself! Sounds like something Daddy would do.
ReplyDeleteCool post! I have minimal knowledge concerning radon mitigation systems, but it sure looks like you did a great job. How long did the project take?
ReplyDeleteRachel -- I think "very dull" is in the eyes of the beholder. I'm impressed that you hung on through the whole thing!
ReplyDeleteJeremy -- I intentionally don't keep track of hours when I attempt a project like this. Most of the work was done a bit at a time in the evenings, although a couple Saturdays were mostly consumed by the project. Time will tell if the project was a success.
Where did you get your condensate dam/condensation bypass from? Lowes told me they didn't carry the part.
ReplyDeleteDave -- I bought my condensate bypass kit at iaqsource.com http://www.iaqsource.com/product.php?p=radonaway_76040-2&product=173618
ReplyDeleteWhere did you buy the cover for the roof stack -- has the wire screen/mesh around the sides?
ReplyDeleteWhere did you buy the roof stack cover -- has the wire mesh/screen around it?
ReplyDeleteTodd, the cap for the roof vent came from radonsupplies.com which has the "Free Flow" style in both 3" and 4" sizes.
ReplyDeleteCare to offer an update on your pCi/L readings? Looking at installing a system in my house.
ReplyDeleteMy radon tester has been out on loan quite a bit since I purchased it three years ago, but every time I've measured (including recently), our level is between 1.1 and 1.3 pCi/L. Our original measurements can be found here: http://threethingsverydullindeed.blogspot.com/2011/04/radon-mitigation-system-testing.html
ReplyDeleteHi. Have you noticed your free flow cap freezing completely?
ReplyDeleteBreckenridge, we've never had a freezing problem with the free flow cap, including last winter (2013 -2014) which was one of our coldest on record. For that matter, I've never noticed any ice at all on the cap!
ReplyDeleteMy wife and I are selling our home and moving out of state. Our potential buyers want us to get the house Radon tested. I have honestly never thought to deal with Radon in any capacity. What does that test entail?
ReplyDeletebryanflake1984| http://www.amcenvironmental.org/#!services/c1pna
Bryan, professionals will likely leave an electronic device in your house for several days that measures the radon concentration in the air averaged over that period. We have a cheaper version of what they use (http://threethingsverydullindeed.blogspot.com/2011/04/radon-mitigation-system-testing.html) that gives results in 48 hours.
ReplyDeleteA less expensive method is a test kit that includes a plastic canister that samples for a predetermined amount of time and is then mailed to a lab for measurement. If your buyers accept those results, you could save a little money that way.
The EPA also has resources specific to each state: http://www.epa.gov/radon/states/michigan.html
Where does radon come from that it needs to be mitigated? One of my friends just installed a radon mitigation system, but he really had no clue what it does. I want to know if I need one, and what it's protecting me from. Thiago | http://www.amcenvironmental.org/#!services/c1pna
ReplyDeleteThiago, radon gas is a product of uranium as it decays in soil. If the air in your home accumulates a high concentration of radon, it can be hazardous to your health. Radon can be tested very inexpensively with a test kit that can be purchased many places online, or a professional can test your home and interpret the results for a higher fee.
ReplyDeleteI am a radon contractor and have to say you did a pretty good job. I have a few recommendations though. First, you need to insulate the pipe in the attic. This will prevent condensation from causing moisture problems in your attic as well as prevent freeze up in the winter. Second you should ditch that cap and just use one with a mesh so the radon is exhausted straight up. You do not have to worry about rain entering the system as it will be very minimal and flow down your pipe ending up under your slab. Other than a few small details it looks great! If anyone has questions feel free to contact me http://www.americanradonmitigation.com
ReplyDeleteThanks for your comments, Jesse. Insulation on the pipe in the attic sounds like a good idea as the air inside the pipe could be more than 50°F cooler than the air in the attic in the summer, which may lead to condensation on the outside of the pipe. I try to stay out of the attic in the summer, but when I have been in there, I've never noticed a condensation issue. What type of insulation do you recommend? Can you share a link to an online description?
ReplyDeleteRegarding the cap, it has served us well in the two main functions I mentioned in the post: keeping critters and most of the rain out, so I don't see a good reason to remove it.
Did you anchor the pipe at any point along the vertical chase? What about the fan? Thanks!
ReplyDeleteThe pipe has a joint just above floor level in the closet. The coupling at that joint rests on the floor providing support for that vertical section. If I had enough room to run one continuous piece of pipe from the elbow in the basement to the fan in the attic I would have been content with a support strap under the basement elbow.
DeleteAre you giving any discount or any running offer. Looking at installing a system in my house.
ReplyDeleteI don't sell radon mitigation equipment or installation services, but it may not be hard to find a contractor in your area that could do the work.
DeleteThanks for sharing. We are also providing radon mitigation services in nashville
ReplyDelete