We make good use of the reading lights mounted in the ceiling of our minivan, so it was a real disappointment when one of those lights suddenly went so dim as to be of little use. Our local dealer offered to fix the problem for $143.50, which I thought was a bit on the expensive side, so I turned to the internet for help. I didn't find a lot there, other than one other minivan owner that had a couple photos of the light assembly. In order to fill that void in the internet, here's my documentation for the benefit of all that attempt this repair after me.
This is the light on the passenger side that is much more dim than normal. If it's not obvious from the photo, you'll just have to trust me.
By contrast, here's the fully functioning light on the driver's side.
To get to the lights you'll need to pry on a corner of the console enough to get your fingers between the console and the roof liner so you can pull it downward. Be careful you don't damage the liner trying to get your prying instrument in place.
There are no threaded fasteners holding the console to the roof, so just pull on each corner until you pull the plastic tabs on the console housing out of the clips that will probably still be captive in the slots on the ceiling.
This is what the console looks like detached from the ceiling. Note the tabs in the four corners, and the two light assemblies on the right side. Before the problem light was removed, I switched the wires from the passenger light with the wires for the driver light so that I could determine whether the problem was in the light or the wiring harness that feeds the lights. Since the passenger light was dim when plugged into the other side of the harness, and the driver light was bright after being switched, I could conclude that the problem was in the light assembly itself.
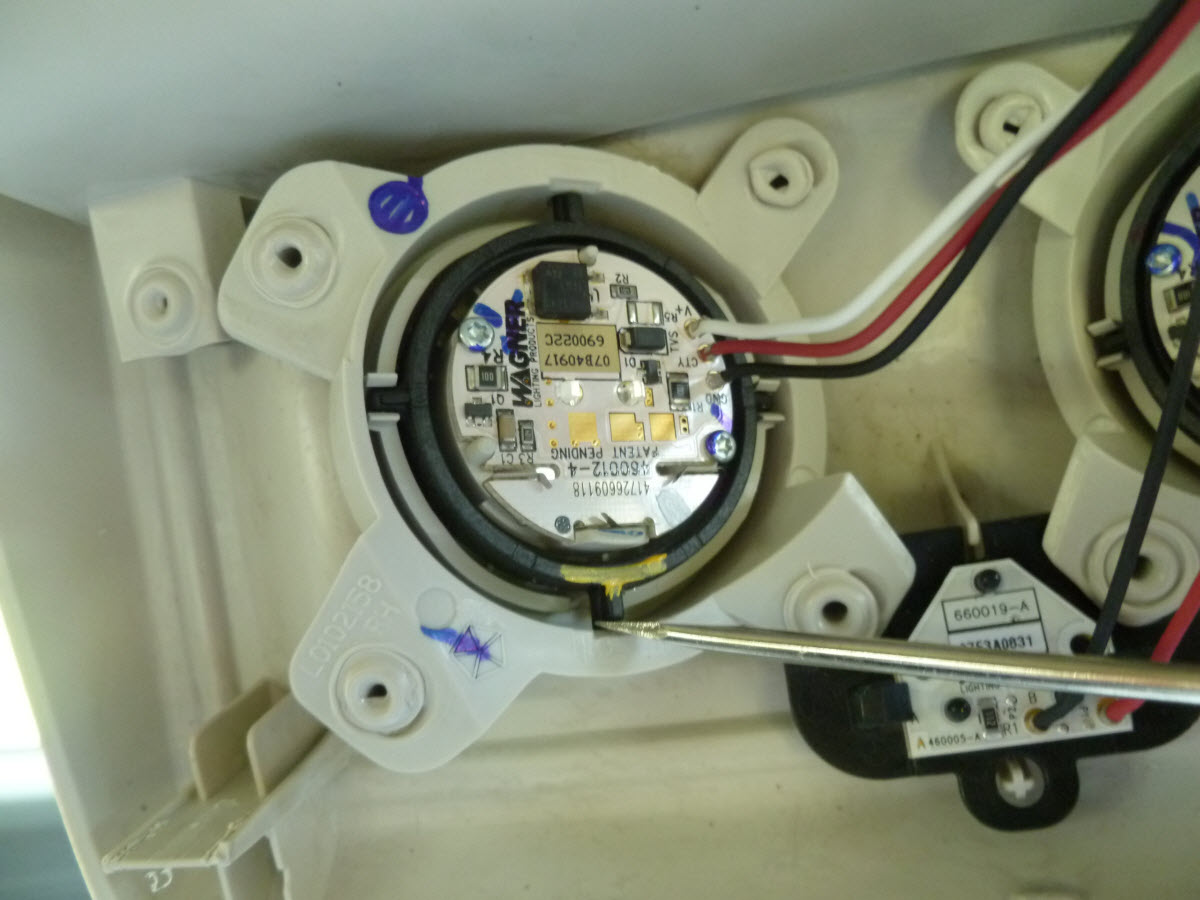
The light is held in the housing by two plastic posts, upon which it pivots in normal operation. In the photo, I'm using a small screwdriver to pry one of the posts enough to get it to pop out of the housing. There's enough springiness in the black ring to accomplish this without a lot of force.
The light assembly can then be removed as the other post will easily slide out of its hole.
The clip attaching the light to the wiring harness can be easily disengaged by pressing the small tab with your finger.
This is the light assembly as you'll be able to purchase it from your Chrysler/Dodge dealer. I doubt that you'll find this one at the aftermarket auto parts stores, although if someone does find it at a non-dealer site, I'd love to know about it! I removed the two screws holding the printed circuit board to the pivot ring to see if I could purchase parts at that level, but the dealer only sold them as you see in the photo. In fact, our dealer will only sell these lights in pairs, so I bought two lights for $103, tax included.
Assembling the new light involves placing one post in a hole and simply pushing the entire assembly as shown until the second post pops into its hole. Barely visible in the photo is a slight ramp outboard of the hole so the post will slide more easily.
Before the console can be attached to the ceiling again, I found it worked best to remove the metal spring clips from the ceiling with your fingers or a pair of pliers. I found it was actually easier to grab with my fingers, although the clip does have some sharp edges.
The clips can then be pressed on to the plastic tabs on the console housing.
The console is now ready to be mounted to the ceiling again after all four clips are mounted on the four tabs.
Pounding firmly with your fist on each corner of the console will seat the clips in their slots.
The finished product is a properly bright light. I don't know much about why an LED light goes dim, but unless one can replace the proper components on the circuit board, perhaps there aren't any cheaper options for this repair. As I mentioned earlier, I purchased two of these lights and have only used one so far. I'd be happy to sell the second one to any of my friends for $51.50 should you ever find yourself in a light-less predicament.